574: FIP Broken Knob Fix


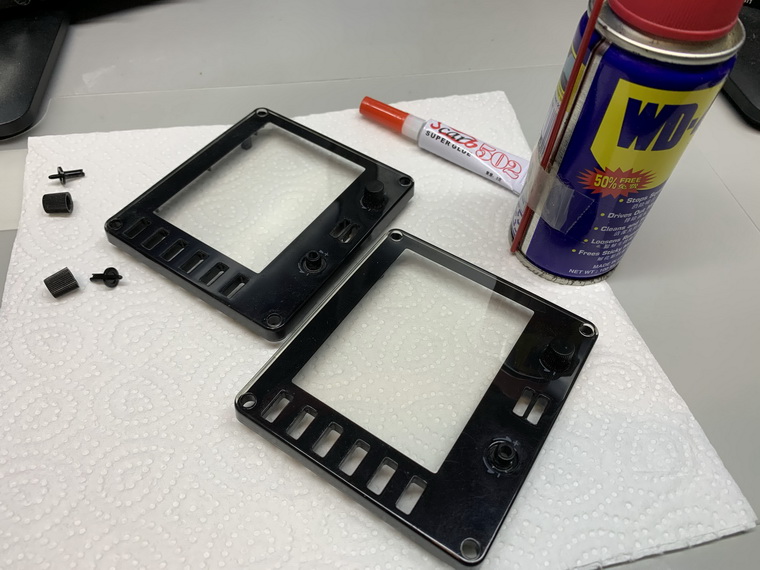
In my Post 574, I mentioned that the two knobs on the face-plate of the FIP, if broken, are simply unrepairable, but Oz Flyer (David) in the Comment suggested two possible solutions to repair them.  Here’s the first one I just tried since I don’t have a 3D printer as required in his second suggestion.

Stuffs needed are just some super glue and WD40, and I put everything on a piece of paper to avoid either the glue or the WD40 spilling over onto the table.
Continue reading

572: A kind of Easter Miracle

A few days ago, another flight instrument panel (FIP) of mine suddenly stopped working.  Didn’t have any symptom similar to the other faulty one I reported in my Post 561, this one just ceased to work — no display, no response — during a flight session.

After trying many possible solutions to revive it but of no avil, I had no choice but to unplug it from the hub and put it aside waiting for another teardown.

Nothing lasts forever in reality, I know.  This one has also served me for more than 10 years.

I was planning to tear it down this morning.  Continue reading

569: My Cockpit Rev #12 – FIP Gauges

While doing fine-tuning and waiting for fixes for the new P3Dv5, I continue to have my cockpit rebuilding going on as planned.  Now is time for the gauge components that reaches a total of 12 FIPs stacking up on top of the HoneyComb Alpha Yoke (click image to see larger picture).  They should be good enough for most of my light aircraft flightsimming requirements.

The 12 FIPs are hooked up to two electrical-powered USB hubs, which are then connected to my Surface Pro that is responsible for the operation and switching of the FIP gauges independently from the main computer. Continue reading

566: Assign HoneyComb Alpha Yoke to P3Dv5 Manually

Since Aerosoft hasn’t updated the driver utility for its HoneyComb Alpha Yoke for P3Dv5 yet (by the time of this post), here’s how to assign the device’s Bridge Module manually for the simulator.

Open the add-on.cfg in “C:\ProgramData\Lockheed Martin\Prepar3D v5” folder, which is where the scenery.cfg is located.

Then add the following to the file:

[Package.0]
PATH=X:\Aerosoft\Honeycomb
TITLE=Alpha Flight Control Bridge Module
ACTIVE=true
REQUIRED=false

I tend to put this script to the beginning of the file above all other sceneries.  Continue reading

565: FSUIPC5 Works on P3Dv5

While waiting to purchase the FSUIPC6 as mentioned in last post, I popped up an idea: “Why not test the existing FSUIPC5 with the new P3D first?”

So I copied the DLL.XML from the configuration directory of P3Dv4 to the directory of P3Dv5.

Bingo!

They work together nicely.   I don’t even need to modify the file at all.   Just copy and paste the DLL.XML from the v4 directory to the new v5 directory and then all is set.

The two folders involved are as follows: Continue reading

563: My Cockpit Rev #11 – Control Cluster

After talking all these year about my cockpit rebuilding, it’s really making progress this time and it should be completed within the next two months if no unexpected issues coming up.

The equipment I finally picked are as follows: Continue reading

562: Turn Off FIP Button Light the Hard Way


Many friends asked if it is possible to turn off the light of the buttons on the Flight Instrument Panels (FIPs) and continue to keep their functions active at the same time.  The answer is NO under the Logitech driver as described in Post 215.

However, from the teardown of the broken FIP reported in last post, I came up a hard(ware) way to do it. Continue reading

561: FIP Teardown

One of my FIPs was broken down recently after serving my flightsimming system stably for more than a decade.  I opened its case to see if it is self-serviceable.  Unfortunately all electronics components, except the LCD screen, were surface-mounted onto the circuit board.

Followings are the teardown pictures of the unit for those who are interested to see what are packed inside the FIP. Continue reading

560: My Cockpit Rev #10 – Parking Brake Remodified

Although the using of the dental floss picks plastic box for the parking brake modification described in the last post does the job nicely, the plastic box itself in milky transparent color, however, looks a bit odd among my other cockpit stuffs.  Moreover, as the case was hard-drilled onto the underneath side of the table, I find I am giving myself a hard time when I need to readjust its position accordingly when the yoke is moved.

After many different attempts, I finally managed to repackage the parking brake module onto a hard paper board cut from an old Chinese Moon Cake box. Continue reading