
——————————————————————————————————————
XPL_GaugeSwitcher (or GaugeSwitcher in short) is a simple utility developed to help users running my XPL Gauges with Logitech’s X-Plane Plugin.
Via the utility, users can create up to eighty (80) different Profiles (i.e. combinations of gauges), so that they can easily switch among them to call up different gauge combinations to match with the setup or the aircraft being flown in X-Plane.
REQUIREMENTS
Prior to installing the XPL_GaugeSwitcher, AT LEAST ONE (1) PIECE OF MY
XPL GAUGES MUST BE INSTALLED FIRST; Otherwise, errors will occur.
Aso, the utility is based on Logitech’s 64-bit X-Plane plugins 8.0.132.0. Newer version is also supported.
INSTALLATION
Installing the XPL_GaugeSwitcher is easy:
Just unzip the utility package and run the installer inside. And then select the Location of your X-Plane folder.
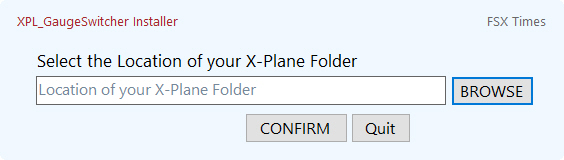
The installer will
1) Place the “XPL_GaugeSwitcher.exe” to your
“X-Plane 11\Resources\plugins\XSaitekProFlight\Data” folder; and
2) Create the first three (3) Startup Profiles for you automatically. 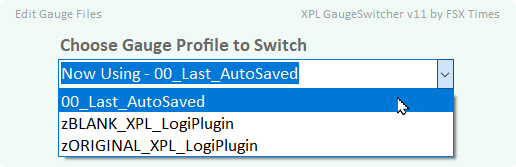
You can now switch among these three Startup Profiles easily.
New with Version 11
An additional FIP profile for the C172SP or B58 might be included with the XPL_GaugeSwitcher sent to you, depending on the gauges you ordered. If so, you will find the specific Profile from the dropdown menu after installation. You can switch to use it immediately.
TIPS 1
– For quick access, you are recommended to create ONE or TWO SHORTCUTS of
the XPL_GaugeSwitcher immediately after installation; and
– Pin the Shortcuts to “Start” and “Taskbar” for easy access.
TIPS 2
– See APPENDIX B at the end of this guide to find out
“How to Activate a Profile While X-Plane running“.
WHAT ARE THE STARTUP PROFILES
The three (3) Startup Profiles are part of the key components of the XPL_GaugeSwitcher, and they can be used to backup and create Profiles in various situations.
The first “00_Last_AutoSaved” is a Profile that contains the backup of the gauge content AT THE TIME the Profile is created. If it is deleted or renamed, a new copy will be created again with the gauge content being used at that time.
The “zBLANK_XPL_LogiPlugin” is a BLANK Profile. It is useful WHEN creating Profiles from the group up. Similary, it will be created again if it is deleted or renamed.
And the third “zORIGINAL_XPL_LogiPlugin” is also a backup Profile, but it contains only the gauge content RIGHT BEFORE the installation of the XPL_GaugeSwitcher. NOTE that it is a ONE-OFF backup. If it is deleted or renamed, it WILL NOT be created again.
IMPORTANT
So in essence, the “00_Last_AutoSaved” is your VERY FIRST workable Profile since it contains the gauge setup you currently use.
ADDING PROFILES
In order to be able to match with the different setups or aircraft being used via the XPL_GaugeSwitcher, you will have to create corresponding Profiles accordingly first. And there are many ways to do it.
METHOD 1
Adding from the Ground Up
To create a new Profile from the ground up (such as a setup for the C172SP), follow the steps below:
1) Open GaugeSwitcher;
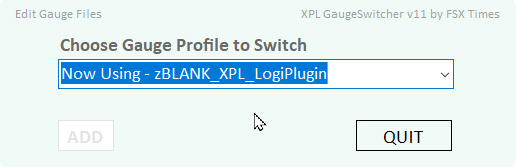
2) Select “zBLANK_PluginPages”;
3) Click [CONFIRM], and the GaugeSwitcher will close;
4) INSTALL the new Gauges for the new Profile in the order you like;
5) REPEAT Step 4 as necessary until all Gauges are installed;
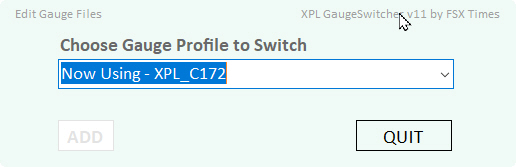
6) Open GaugeSwitcher again;
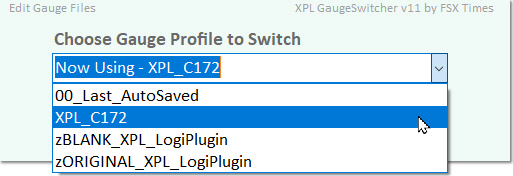
7) Click [ADD] button on the left;
8) Enter a name (e.g. XPL_C172) for the new Profile and [CONFIRM];

9) The new Profile will be created and shown on the dropdown list.
IMPORTANT
Although a new Profile has been created from above steps, you’ll still need to assign the correct Gauges to the correct FIPs so that they can show up on the same FIPs everytime when the Profile is selected.
10) Load up a flight session in X-Plane with the new Profile just created;
11) Press the Up/Down buttons on each FIP to choose the correct Gauges to display;
12) When done, Quit X-Plane;
13) Open GaugeSwitcher;
14) Click the [ADD] button on the left;
15) Enter THE SAME NAME (e.g. XPL_C172SP) for the Profile again;
16) Click [CONFIRM] to OVERWRITE.
Now the new Profile is fully created and it will load up the same Gauges on the same FIPs when the Profile is selected.
METHOD 2
Adding from an Existing Profile
If an existing Profile (such as the “00_Last_AutoSaved” automatically saved by the GaugeSwitcher, or the XPL_C172SP generated in METHOD I above) already includes some Gauges that are identical in the new setup you are going to build (such as the CT210M), this approach — Adding from an Existing Profile — should prove to be a more efficient way.
Here are the steps:
1) Open GaugeSwitcher (while X-Plane is not running);
2) Switch to the relevant Profile (e.g. XPL_C172SP), and the GaugeSwitcher will close;
3) INSTALL the new Gauges required by the new Profile in the order you like;
4) REMOVE all irrelevant Gauges (e.g. the C172SP Gauges) from the “XPL_LogiPlugin.xml”
when it is opened during installations;
5) If needed, REORDER the Gauges in the “XPL_LogiPlugin.xml” at the same time;
6) REPEAT Step 3 to 5 until all Gauges are installed;
7) Open GaugeSwitcher;
8) Click the [ADD] button;
9) Enter a name (e.g. XPL_CT210M) for the new Profile and [CONFIRM];
10) A new Profile that is based on the existing Profile is created.
IMPORTANT
Similarly, you’ll still need to assign the correct Gauges to the correct FIPs in order to have them displaying properly when the Profile is selected.
There are two (2) options to carry out the assignment:
OPTION A
Follow the Steps from 10 to 16 in METHOD I, and ensure to re-enter the SAME NAME for the new Profile being created in Step 15.
OPTION B
Follow the Steps below:
11) Open the “FSX_Times_SaiFlight_FIP” folder under
“X-Plane 11\Resources\plugins\XSaitekProFlight\Data” directory;
12) Search for the file with the name of the Profile just created (e.g. XPL_CT210M)
and the suffix of “_Fip” (e.g. XPL_CT210M_Fip.xml);
13) Open the file (e.g. XPL_CT210M_Fip.xml) with a text editor;
In the file:
– “Fip Serial” is the serial number (identifier) of the FIP, which is shown on the
screen of the device when power is on; and
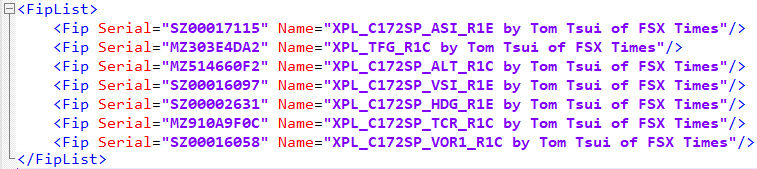 – “Name” is the Name of the Gauge associated with the FIP, which is declared on
the first line in the Gauge file;

14) Replace all irrelevant “Name” entries (e.g. those C172 Gauges) with the correct
names from the new Gauges (e.g. CT210M Gauges);
15) Save the file when finished and the new Profile is fully created.
IMPORTANT
After changing the “_Fip” file, you’ll have to re-select the Profile and re-load it again to activate the changes.
Both OPTION A and B approaches have their pros and cons.
In A, you don’t have to do any editing by yourself. But it takes time to load up a flight session in X-Plane and to select the correct Gauges on the FIPs.
In B, the time required is shorter but users may get confused when there are a lot of FIPs involved to change.
Anyway, both Options are NOT complicated. Just need a little patience and carefulness.
RENAMING & DELETING PROFILES
Besides the ADDING function, the XPL_GaugeSwitcher can rename or delete Profiles as well. And it is easy:
1) Open GaugeSwitcher;
2) Select the Profile you want to rename or delete;
3) Instead of clicking [CONFIRM] on the right to switch:
– Click the [REN] Button on the left to rename the Profile; or
– Click the [DEL] Button next to it to delete the Profile;
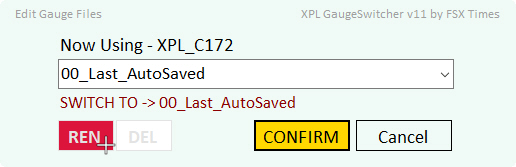
4) Then [CONFIRM] the action.
TIPS 3
You CANNOT rename or delete a Profile being used. You’ll need to switch to any other Profile first in order to be able to rename it or delete it.
MIXING ADDING, RENAMING & DELETING
Actually you can mix and match the two adding methods and the renaming & deleting functions together for various scenerios.
For example, if you at some point want a new backup for the Profile being used, you can DELETE the Startup Profile “00_Last_AutoSaved” to force the GaugeSwitcher to create a new “00_Last_AutoSaved” from the current Profile, because the “00_Last_AutoSaved” will be re-created when it is renamed or deleted.
Similary, you may RENAME the “00_Last_AutoSaved” to something else. Then you get a new Profile plus a new copy of the “00_Last_AutoSaved”.
Also in a case you have a Profile for the C172 (for example) which has 11 Gauges in it. But you only have four (4) FIPs.
You can then create three (3) C172 Profiles simultaneously and have each of them responsible for a different set of Gauges, such as:
C172 Profile A – ASI, ATT, ALT, VOR1
C172 Profile B – TCR, HDG, VSI, VOR2
C172 Profile C – ENG, RPM, ADF, VOR2
So you can quickly switch among the three Profiles for the Gauges you want, instead of pressing the Up/Down buttons on the FIPs to change to the different Gauges under a single Profile all the time.
How to do it ? I’ll leave them for you to explore.
ADDITIONAL FEATURES
You can
– Click on the Header on the Right to call up this User Guide; or
– Click on the Header on the Left to open the following files:
“XPL_LogiPlugin.xml” – with info of current Active Profile
“XSaitekFip.xml” – with info of Gauges Currently Assigned to which FIPs
APPENDIX A
Comment Out Irrelevant Gauges
While editing an Existing Profile, you may “Comment Out” the irrelevant entries instead of deleting them from the Profile as shown below. In case you want them again in the future, you can easily “Un-Comment” them.

NOTE that there is NO EMPTY SPACE between the two hypens in both Comment Marks “<!- -” and “- ->”
TIPS 4
The cleaner your keep your Profiles, the better performance your system will gain from it.
TIPS 5
When starting up X-Plane, it is highly recommended to keep the FIPs in power OFF state until a flight session is loaded. This helps speeding up the loading of X-Plane.
APPENDIX B
How to Activate or Reactivate a Profile While X-Plane is running
In fact, you can switch among different Gauge Profiles WHENEVER you like regardless X-Plane is running or not.
However, switching a Profile DURING A FLIGHT SESSION, the Profile being switched WILL NOT BE ABLE TO USE immediately. This is due to X-Plane’s own file running structure.
Therefore, in order to be able to use the Profile being switched during a flight session, you’ll have to force X-Plane to RELOAD ITS PLUGIN SERVICES again.
There are two ways to do it:
METHOD 1
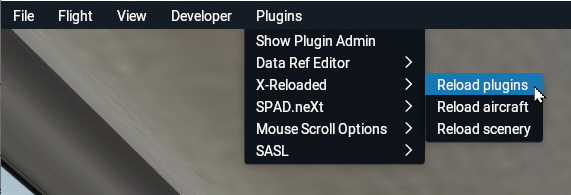
Download and install the utility “X-Reloaded” by barbarossa from X-Plane.org.
Then everytime after switching a Profile, you can simply run the utility and select the “Reload plugins” option. That will force X-Plane to reload the services to activate the Profile immediately.
This is my preferred choice. However, since X-Plane takes up huge system memory, unloading and reloading plugins via the utility may cause system crash sometimes.
METHOD 2
Besides using the “X-Reloaded” utility, it is also possible to force X-Plane to reload the plugin services thru the steps below:
- Pause the flight session
- Turn OFF the power of all FIPs
- Run XPL_GaugeSwitcher and choose the Profile desired
- Click on the “airplane” icon on the X-Plane menu bar at the top of the screen
- Choose a new “Aircraft” or Choose to “Change Location” (select the same location for current flight)
- Start a “New Flight”
- Turn ON the FIPs after the new session is loaded
- Un-pause X-Plane
The steps above may look a bit clumsy. But it serves well to force X-Plane to activate the Profile being switched without the risk of crashing the system.
The choice is yours.
–
APPENDIX C
How to Save Changes made to a Profile Being Used
If during a flight session in X-Plane you swapped some of the gauges being used in a Profile (say XPL_C172) and you want to keep the changes, you can do the following:
1) Quit the flight session to the Main Menu or exit X-Plane;
2) Open XPL_GaugeSwitcher and use the ADD function to create a Profile using the
SAME Profile Name (XPL_C172)
3) Confirm Overwriting to proceed and the changes will be saved.
IMPORTANT
Step 1) Quit to the Main Menu or exit X-Plane is necessary; otherwise, changes are considered temporary and WILL NOT BE SAVED.
–
APPENDIX D
How to Re-run a Profile Being Used
Sometimes it is necessary to re-run a Profile being used, say you’ve made changes to the Profile according to Appendix C.
To re-run a Profile, simply call up the GaugeSwitcher and press [Enter] on the keyboard. Then Confirm the switching.
–
–
====================================================
That’s all for now.
Via the XPL_GaugeSwitcher, you can easily create up to eighty (80) different Profiles and quickly switch among them to match with any setup or aircraft you are using.
Stay Safe and Happy Flying.
Tom Tsui
FSX Times
Updated on May-2021
