
If you have ever used any trim wheel circuited with an encoder before, you should have experienced that the last position remembered by it could be very annoying if you forget to set its position back to the center at the start of a flight.
 Since I got the Cessna Trim Wheel from Saitek many years ago, I’ve been looking for a solution to this annoyance. But search is futile.
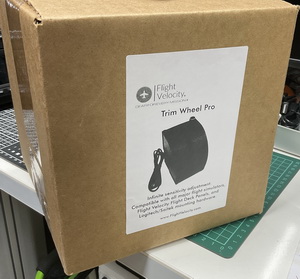
So when I found out Flight Velocity was soon to release a new product called Trim Wheel Pro which would use new software last Decemeber, I was quite excited, hoping that it could be a remedy to my agony.
Unfortunately, after checking with the company, the new player is no exception. The issue seems to be unsolvable.
Nevertheless, as the product is equipped with a control knob to allow users to adjust the rotation speed of trimming, I decided to get one to give this interesting idea a try.
The Body
After unboxing the package, my first impression was, “Gosh…a hand-made DIY?”
Unlike the Saitek trim wheel which was made of plastic by proper molding in factory production, the Trim Wheel Pro from Flight Velocity, even it is not DIY, I bet it is at least 50% hand-made. I never bought such kind of hand-made gear before.
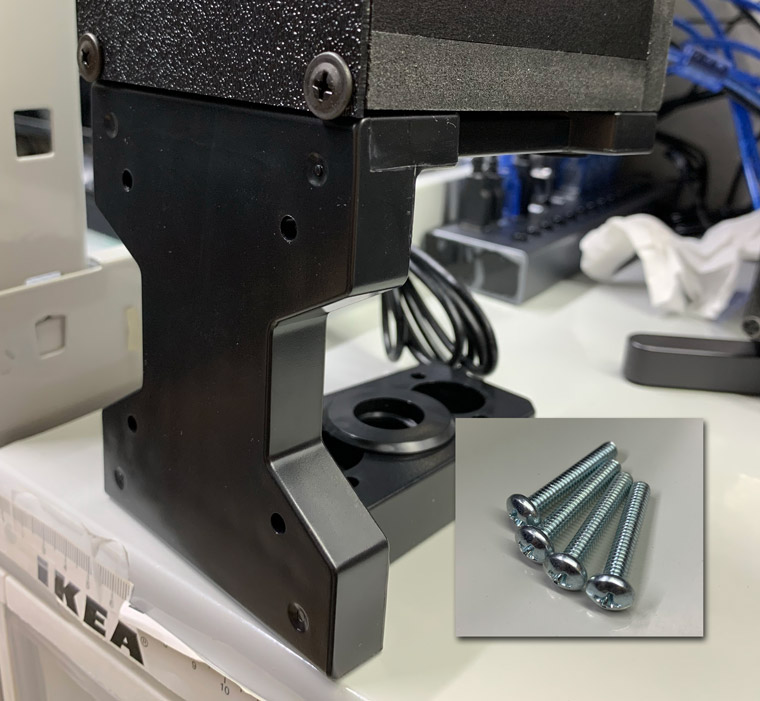
In addition, except the front plate and the trim wheel parts are in plastic, the rest of the body is made of wood.
(Edit: Tiger Summers, CEO and Founder of Flight Velocity, sent a clarification in the Comment section that there is no wood in this or any product they make, and they design and manufacture all of their products in-house in the US using precision CNC machining, ABS, and PVC plastics — see more details in the Comment section at the end of the post.)
Frankly speaking, it’s fine with me whether it is hand-made or not, and I don’t care much about what materials it uses either. But truly, the assembly is a bit coarse.
The body parts were polished a bit for sure. But there are still tiny debris on the wooden plastic fiber parts, and improper sharp edges on the wheel, not to mention the side boards were not cut precisely.


Furthermore, due to the connecting screws chosen are too big or the wooden fiber boards are too thin, there are pop-outs and tiny cracks on the wooden fiber around the joins.


Fortunately, they still hold firmly together, and the body as a whole is sturdy.
Dimension-wise, it is about the exact size of the Saitek unit and weights about the same. And users can even mount it onto the original bracket coming with the Saitek unit via the 4 screws included in the package, if such a need is required.
Installation
 It is not required. It’s plug and play and works like a normal USB game controller.
In addition, assigning the elevator trim functions to the product in MSFS is straight forward, too.
The Wheel
The wheel of the unit is about the same size and thickness of the Saitek one. Since I didn’t open the chassis, I couldn’t tell how it is hold inside the unit. But one big difference of it from the Saitek one I’ve been using for years is the wheel moves swiftly, very swiftly.
The wheel can be moved by very little force.
I would imagine, if the Trim Wheel Pro were to be put on a real aircraft, the vibration of the aircraft itself might be strong enough to cause displacement to the trim already.
Fortunately or unfortunately, my flightsim cockpit is a static one. So the concern should not be a problem. But I still need time to get accustom to the lightness of it.
Comparatively, the Saitek Trim Wheel does a better job in this respect.
The Knob
Due to the swifty nature of the wheel, I couldn’t stop thinking 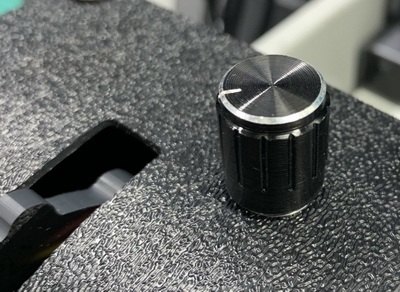 the original intention of the adjustable knob might be a device to counteract the “looseness” of the wheel in the first place. Just another fancy imagination.
Anyway, the adjustable knob does prove its value.
For instance, in a situation where an aircraft is rising or dropping crazily because you forget to reset the trim wheel to its center position at the start of the flight, you can quickly turn the knob to its maximum, so as to speed up the trimming action to rectify the aircraft back to normal flying via relatively smaller movements on the wheel.
In another, when an aircraft is about to get level, you can turn the knob closer to its minimum, so as to be able to finetune the trim movement effectively.
Nevertheless, I found the first 10% of the adjustment range (from minimum onwards) the most effective in normal operation. To be honest, the remaining 90% is only useful during unusual circumstances.
On the webpage of the product, the company mentioned that new software was written for the product.
But frankly I don’t feel any difference from it. Probably the new software refers to the knob adjustment so that trim rotations can speed up or slow down accordingly.
Modification
I have a few times seriously thinking to open the chassis to see how the wheel works inside, so as to come up with any possibility to tune down the “looseness” of the wheel.
I didn’t do it eventually (might be in the future) because I was scared that I might crack the joins as there are pop-outs around the wooden fiber already as I mentioned earlier.
Hm…could these cracks be a strategic design to prevent users from opening the unit? Another crazy imagination.
So, nothing was changed on the unit…ar…wait…yes
I found the cap of the control knob a bit small and not efficient to use. So I replaced it with a bigger one.
Now the knob can be turned fast or slow effortlessly, which is a lot more efficient and effective than with the original cap.
Conclusion
- So, is the Trim Wheel Pro good?
Well, no doubt it has imperfections. But it is still a reasonably good device.
Besides, since there aren’t much choices available on the market and the price of it ($99.99) isn’t expensive, it should worth a place on anybody’s flightsim gear purchase list, if a trim wheel is being considered.
- Will it replace my Saitek Trim Wheel ?
Possible. But I still need a bit more time to support my decision.
- Is the adjustment knob an “overdo” since no such feature is found on the real aircraft ?
Who cares! It’s for flight simulation, and we are not talking about any FAA certified device. Most importantly, it adds fun.
The Verdict
By no means to be harsh, if 5 stars rate the best,
The body construction quality of the Trim Wheel Pro worths 3 stars
The wheel design & performance 3 stars
The adjustment knob 4 stars; and
Overall operation and performance 4 stars
–
–

Hi Tom,
Thank you for reviewing the Trim Wheel Pro, we really appreciate your feedback and look forward to hearing everyone’s comments. In fact, here are a couple of our comments.
First, there is no wood in this or any product we make. We design and manufacture all of our products in-house here in the US using precision CNC machining, ABS, and PVC plastics.
Second, with regard to the trim wheel “remembering” its placement from session to session. This can be a long topic, but the short version is this: we could possibly “sync” the trim wheel with the sim while the sim is active, IF we wrote a plugin for each sim. This would NOT, however, save this state from session to session. So with little real-world benefit to writing this software, and the increased hassle of making our users have to download and install it, we chose to go without the plugin.
I hope that helps explain things, and we look forward to helping the flight sim community in any way we can.
Best,
Tiger
LikeLike
Dear Tigers,
Thanks for the clarification on the materials used on the Trim Wheel Pro and the note about the “remembering” effect situation.
It helps to know better your products.
Best
Tom
LikeLiked by 1 person
I made edit to the material used in the story accordingly.
LikeLiked by 1 person
Thanks again, Tom!
LikeLike
You’re welcome.
LikeLike
I agree with Tom’s “annoyance” that at start-up, the simulators are not “in-sync” with a trim wheel’s position. I haven’t had much luck leaving the trim wheel “centered to neutral” at shut down. It is also a pain having to go to a 3D cockpit view to sync and center the trim wheel.
I have a G1000 cockpit with a couple of FIPs for redundant airspeed/attitude/altitude [just like a real plane,] I asked Tom if he could put the trim wheel position indicator to an altimeter like he had added previously to his C172 tachometer. Tom quickly replied with a MSFS altimeter gauge “trim extension” and I can now use it to “sync” a [Saitek/Flight Velocity] trim wheel at start-up without switching to an instrument view. Thanks Tom for making the simulator more real.
LikeLike
As an owner and user of both Trim Wheel Pro and the Saitek Cessna Trim Wheel (on two different simulators), they are used often. And I totally agree with your review. My Trim Wheel Pro was a little better constructed as it was an early pre-order and hence had the benefit of the earlier Flight Velocity Trim Wheel production lessons. However the Trim Wheel Pro is more easily turned and it’s deep notched wheel just doesn’t the same feel as the Saitek’s knurled one.
I do like Tom’s “two finger” wheel+knob technique, but it doesn’t work for me as I have the Saitek throttle placed against the right side of the Trim Wheel Pro.
I found a good “medium fine” position for the knob, that works for both take-off and level flight. This made the response similar to the non-knobed Saitek.that I am used to.
Bottom line is you should have a trim wheel for better simulator flying, and the Saitek or either Flight Velocity models work well.
LikeLike
Thanks for the comment, Jim.
Instead of setting a fixed sweet spot, I prefer turning the knob as needed. That’s what the knob is for.
LikeLike
Looking at my FV trim wheel and I’m not seeing any cracks or shoddy assembly. In fact it looks pretty well put together (yes, it does have a bit of ”hand fitted’ feel but that’s ok as I’m sure FV’s sales don’t require high volume production). Also my wheel doesn’t have the motion that yours seems to (mine has a little resistance).
Hope it works out for you.
LikeLike
Good for you, Jenny.
The Pro version is based on the one you have. I guess the assembler wasn’t in good shape. ;)
LikeLike